
IT Resources | NC State IMSEI

IT Resources
Last Updated: 07/22/2022 and all information on this page is accurate and up-to-date
Need Help?
The IMSEI Helpdesk is here for you if you need tech support.
Software Resources
NC State University provides a wide range of software to students, faculty, and staff at no cost or a discounted rate. Use the links below to find and download the software you need.
- NC State College of Engineering Licensed Software – Available Software licensed via COE/OR
- NC State University Licensed Software – Available Software licensed via NC State
- OnTheHUB Discounted Software for OR – Free and/or discounted software available to STEM majors
- Microsoft Azure Dev Tools for Teaching – Free access to MS Dev Products and Azure Credits
- ISE Grammarly License Request Form – Request a license to fully-featured Grammarly
Still can’t find the software you need? Complete the Software Request Form or contact the IMSEI Helpdesk at isehelp@ncsu.edu.
How To’s and Documentation
How-to Remotely Connect to Your Office PC
You can work remotely on your IMSEI-owned campus computer. To get remote access, fill out the Request Remote PC Access Form. When using Microsoft’s Remote Desktop Protocol (RDP) off-campus, you must first connect to NC State’s Virtual Private Network (VPN). This step is required to access your office computer securely.
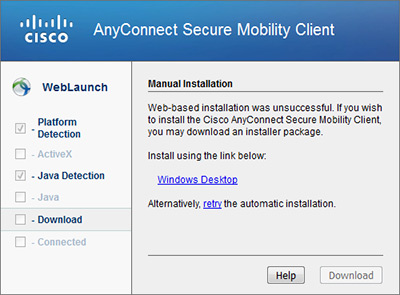
STEP 1: Connect to the VPN (for off-campus access)
- Visit the VPN Installation Instructions page and log in with your UNITY ID and password.
- Follow the instructions to install the AnyConnect Secure Mobility Client on your computer.
- After installation, connect to vpn.ncsu.edu to ensure secure access.

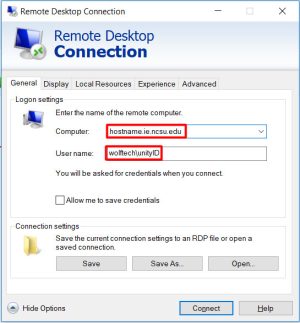
STEP 2: Remote Desktop
Remote Desktop, or “RDP,” lets you connect to your Windows PC from another computer. Mac users can find this application via the Mac App Store. Here’s how to find and use it:
- Windows 7: Press the Windows key, then type Remote Desktop Connection in the search bar
- Windows 8: Move your mouse to the upper or lower right corner of the Start screen to open the menu. Click the Search Icon, then type Remote Desktop Connection.
- Windows 10: On your home screen, type Remote Desktop Connection in the search bar labeled Search the Web and Windows.
A pop-up window will appear on your screen. In the designated field, type [Hostname or IP of PC], then click Connect to proceed.

Finally, a pop-up window will prompt you to enter your Unity ID and password. For the username, type “wolftech\unityID” . Once you’ve entered the details, click OK. Your office PC desktop will then appear on your screen.
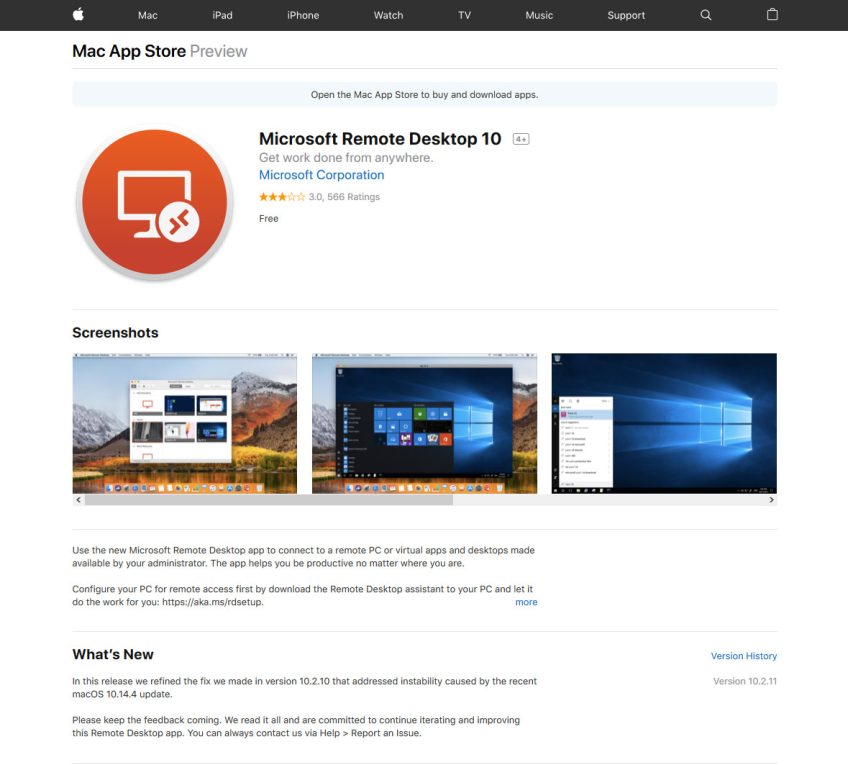
Connecting from Mac
macOS does not include Microsoft’s Remote Desktop Protocol by default. To access your office computer remotely, students, staff and faculty need to install RDP themselves. Visit RDP’s App Store page to download and install the application.
How-to Connect to your office printer
Every IMSEI networked printer is named after a North Carolina city or town. You can find the hostname on a label on the printer, as shown in the photo below.
Follow these instructions to install printers using their IP/hostname in the format “CityName.ie.ncsu.edu.”
Note: These instructions apply to student-owned computers. IMSEI-owned PCs automatically have access to the print queue. If you are using an IMSEI-owned PC and cannot find a printer, email isehelp@ncsu.edu with your computer’s hostname, and we will assist you.

Connecting from windows
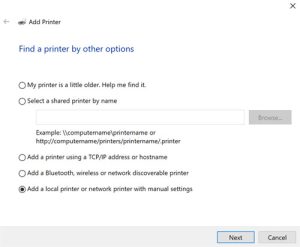
- Open the Start Menu, type “Control Panel” in the search bar, and select Devices and Printers from the options.
- In the Devices and Printers window, click Add a printer.
- When prompted, select The printer that I want isn’t listed.
- Choose Add a local printer or network printer with manual settings, then click Next.
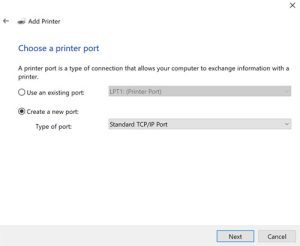
- Select Create a new port and choose Standard TCP/IP Port from the dropdown menu. Then, click Next to proceed.
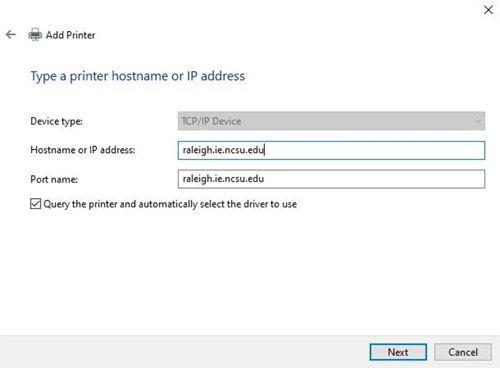
- Under Hostname or IP address, type the printer’s hostname followed by “.ie.ncsu.edu”.
For example, if the printer’s hostname is Raleigh, enter raleigh.ie.ncsu.edu.
- Windows should automatically find the driver for your printer.
(For Brother printers, select Brother PS Driver when prompted.)

- Once Windows finds the driver, type in the printer name (you can choose any name you like) and click Next.
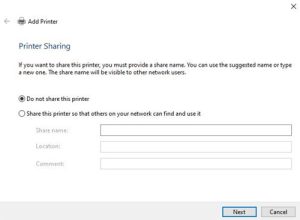
- In the Printer Sharing window, select Do not share this printer, then click Next.
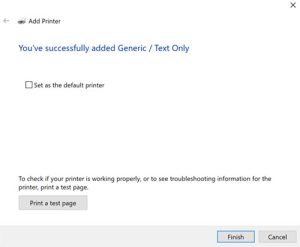
- If you want this printer to be the default, check the Set as the default printer box. It’s a good idea to Print a test page to confirm that it works. Finally, click Finish.
- The printer should now appear in Devices and Printers and be available for selection when printing from documents or other applications.
Connecting from Mac
If the network printer you need isn’t listed, you can add it as an IP printer. First, ensure that your software is up to date. Then, follow the steps to manually add the printer using its IP address or hostname. This will allow you to access and print from the network printer.
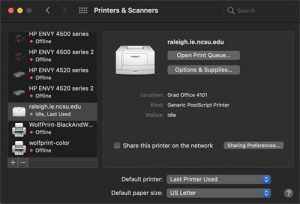
- To add a printer on macOS, choose the Apple Menu > System Preferences, then select Printers & Scanners.
- Click the Add button at the bottom of the printer list, select the IP tab, then enter the printer information using the following details:
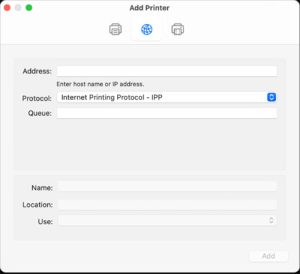
- Address: Enter the hostname followed by “.ie.ncsu.edu”. For example, if the printer’s hostname is Raleigh, type “raleigh.ie.ncsu.edu”.
- Protocol: Click the Protocol dropdown menu and select the appropriate printing protocol:
- Internet Printing Protocol (IPP): Use this for modern printers and print servers.
- Queue: If your printer requires a queue name, enter it here. If unsure, leave it blank or check with your network administrator.
- Name: Enter a descriptive name for the printer (e.g., “Color Laser Printer”) so you can easily identify it in the Printer pop-up menu.
- Location: Enter the printer’s location (e.g., “outside my office”) to help identify it in the Printer pop-up menu.
- Use: If the correct printer software doesn’t appear in the pop-up menu, click Select Printer Software and choose the appropriate software for your printer from the Printer Software list.
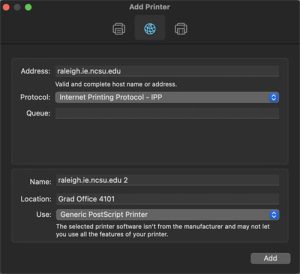
Your printer should now be connected to the printer.
Additional Computing Services
HPC via VCL
VCL (Virtual Computing Lab) provides students and faculty with remote access to Virtual Machines (VMs) for a variety of purposes. The ISE department hosts a collection of HPC (High-Performance Computing) VMs, which are designed to address a wide range of HPC needs that are not optimized for NC State’s main HPC system.
For detailed instructions on how to use ISE’s HPC resources in VCL, visit the ISE VCL Research Computing documentation resources page.
NC State HPC
NC State University High-Performance Computing (HPC) is part of an initiative to provide state-of-the-art support for research and academic computing at NC State. The HPC group offers students and faculty access to entry and medium-level high-performance computing resources, consulting support and assistance with scientific workflows.
To learn more about HPC or to request access to your project, visit hpc.ncsu.edu.
STORAGE RESOURCES
NC State University provides a range of data storage solutions for various needs, including:
- Productivity and Office Documents
- Academic, Research and High-Performance Computing (HPC)
- General Storage and Backup
For more details on OIT’s storage resources, visit the OIT Storage Resource Summary